
Home Testing
If you were diabetic, your doctor wouldn't insist you come in once a week to check your blood sugar. They'd insist you test yourself multiple times per day.
Take it from someone who knows — my father was diabetic the last 15 years of his life, and when he became too weak to test himself and administer his own insulin, I did it for him. I'd had plenty of practice — Laurie had taught me how to test Jasper years before, and since Jasper lacked opposable thumbs, he let me administer his insulin shots too.
The point we're getting at is this: If you want to regulate your pet's blood sugar, you need to be testing your pet daily. Of course, this is the best-case scenario. If you can't do daily tests, testing a few times a week is better than nothing. What's not good is to rely on the vet's expensive, stress-skewed tests as the only way to determine if your cat's sugar is under control. Glucose testing done at the vet can be 100 points higher than what you'd get at home, simply due to the stress and its impact on the body - the cat's body will actually produce more sugar in response to the stress of a vet visit, which is why many vets end up prescribing an insulin dose that's too high, based on the numbers he or she gets from a stressed-out cat. Home testing eliminates the stress factor.
Don't be such a baby ;-)
Children as young as 4 years old test themselves twice a day, so there's no reason you can't test your pet! If you want to save them the stress of weekly or monthly trips to the vet for testing, if you want to save yourself hundreds of dollars a year in vet bills and hours of time running to and from the vet, you'll love home testing.
If the thought of pricking your pet's ear to draw a drop of blood scares you, take a breath and think about it. If you can get over that fear (and it's a silly fear, if you really think about it), you can help your pet get regulated and stay that way. Imagine knowing your pet's blood sugar at any time of day or night. No more wondering if they're running high or low, or if the insulin is working or if the dry food they insist on eating is raising their blood sugar.
You can find the right dose all by yourself by testing before each shot, every day, and plotting your own curves to see how your pet is responding to the insulin over the course of a day.
Still not sold? The only people who can’t easily do home testing are people who care for feral (wild, stray) cats or very wild dogs who won’t let people hold or touch them. You have to be able to hold the animal or sit next to him and know he won’t run for a minute. If your cat will sit in your lap or allow you to sit beside them, and if you can touch their ears without being scratched or bitten, you can home test successfully.
Your Shopping List
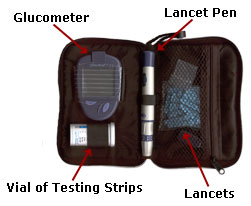
1. A Glucometer
Retails for about $40, available at any drug store. We liked the Bayer Elite/Ascencia (the name changed in recent years) or the One-Touch Ultra. Both are very easy to use, and I’ve never seen a pharmacy that doesn’t have them in stock. Of course, glucometers improve every year, and the prices drop too. So, realize the glucometers we happen to mention aren't the only easy monitors that use very little blood. We encourage you to shop around. The ones that test on the forearm (for humans) usually require very little blood, so they can be a good choice. Don't be afraid to ask the pharmacist!
The things to look for are:
Ease of use
For example, you don't want one of the old meters that requires you to bring
the blood to the meter — as opposed to the more common ones where
you place the test strip in the meter, then touch it to the drop of blood.
A meter that requires less blood
Trust us — some of the old meters were like battery-operated vampires. The big selling point of modern meters is that they require less blood. This means humans can stick themselves in the less-sensitive areas that produce less blood, instead of in the soft fleshy areas (finger tips), which hurts like crazy.
Of course, when testing a pet you aren't going to be jabbing them in the soft sensitive areas either. We always stuck Jasper on the back of his ear, near the tips. The first few times we did this, he gave us a dirty look, but after the second or third day he could have cared less. Since a test typically meant it was time to eat, the only trouble with testing became keeping him from sprinting to his food dish while we were trying to get a reading!
2. A box of glucometer test strips
...to match the meter you bought. A box of test strips costs about $50 for 100 strips. You can often get good prices at places like Walmart, rather than small drug stores. Shop around.
3. A bag/packet of lancets
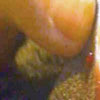
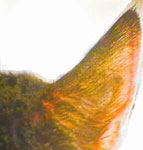 ...the tiny pins you use to prick the cat’s ear. There are a good series of veins right along the edge of the ear, as shown in the the figure on the right.
The glucometer will come with a lancet pen. This is a little spring-loaded device that shoots the pin out and into the skin. You can set the depth so as to prick them only as deep as necessary to draw the small amount of blood you need. A pack of 50 lancets will cost about $10, and last you a long, long time. (I still find unopened packs of lancets in the back of the linen closet!)
Unlike syringes which should NEVER be used twice, you can use a lancet more than once, as long as you use alcohol to clean it between uses. Some people use a fresh lancet for each test, and that's fine (perhaps wise), but many don't — I refer to both human diabetics and people testing animals — and it doesn't seem to present any problems.
We repeat: NEVER use a syringe twice. Always deposit the used syringes in a sharps container at your vet's (or get one of your own) — don't just toss them in the trash.
Now, before you panic and think that your pet will wig out if you do this, realize that his ears have very few skin nerves in them. That’s why you use the ears rather than the pads on the feet – the fleshy pads DO have a lot of nerves (just like our fingers, which is why the new, improved glucometer's require less blood, so you can prick in the less sensitive places!). Another reason to never, ever use the feet? They dig in their litter with those feet, and you'd just be begging for an infection.
When it’s done on the ear, it’s a quick sting, and that’s it. We promise. Jasper never even flinched. You can get your pet used to having his ears touched by starting to play with them now – hold the cup of his ear between your fingers, rub his ears, just play with them. That way it won’t be a shock when you start handling his ears in order to test him.
If an animal’s ear is cold to the touch prior to a test, you may have trouble getting a large enough blood drop, so if you feel the ear and it’s cold, try one of these two methods:
- Take a baby food or similar small jar (empty and washed), and place a wet square of paper towel inside it, wadded up. Put the jar in the microwave (without the lid) for 20 seconds. Remove the jar, replace the lid (to keep the heat in) and even if it's hot to your fingers, quickly hold it to the cat's ear (before the jar cools off) and rub it lightly against the under and top sides of the ear you want to prick -- do this for about 20 seconds. This will dilate the capillaries nicely. The next time you test, just re-wet the paper towel inside the jar before heating, and this device can be used over and over.
- Alternatively, take a clean, dry sock, and pour some uncooked, dry rice into the toe. Knot the sock to keep the rice in the toe, and place that in the microwave, again for 20 or 30 seconds, and then press that to the cat's ear, and hold it there, for about 20 seconds or so. Using brown rice makes for a nice, nutty fragrance. You can keep re-using the same sock and rice, so once you've made this device, just keep it by the microwave for testing purposes.
Remember, the goal is to simply dilate the capillaries so that you get a nice drop without having to prick the ear more than once. You aren't trying to get a whole lot of blood -- because you don’t need much blood at all, you just need enough to fill the tiny column at the very tip of the test strip. The size drop you need is literally about the size of this 0, or smaller, depending on the meter.
How it's done
1. Put a test strip in the end of the meter, the meter turns on automatically, and waits for you.
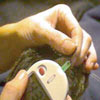
2. Take a baby food jar, place a wet paper towel in it, and place it in the microwave for about 20 seconds. Take it out, put the lid back on the jar, and place it against your pet's ear to get the circulation going.
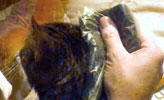
(This image below shows a warm wet wash cloth in a plastic bag, but we found the baby food jar method works better.)
3. Then take the lancet pen with a lancet in it, and cock it (pull the spring loaded trigger back) and press the tip of the pen to the back of your pet’s ear, along one of the outer veins (shown here).
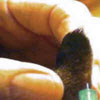
4. You press the button on the side of the pen, and click! The pin quickly shoots into and then back out of the cat’s ear, and a blood drop forms.
5. Touch the tip of the test strip to the drop, and the strip sips the blood in. 30 seconds later (the meter counts down), your result appears in the meter’s window.
6. Write it down (We kept a note pad with the meter, and noted the results of every test we did). That’s all there is to it – it takes about 5 minutes. So, it’s no big deal in terms of your schedule.
What's a Blood Glucose Curve?
A curve is a series of blood tests done over 1 or 2 days, in 2-3 hour intervals. The results show you how long the insulin lasts, how the cat’s glucose responds to food, and how the cat's sugar levels are over the course of a full day. You can do a curve on the weekends or any time you'll be home for an entire day.